


Slate Roofing is a very popular choice when it comes to deciding which roofing material to use on a pitched roof. As well as being aesthetically pleasing, and increasing the potential selling value of the house, slate roofs have a number of physical benefits. Slate is a durable and hard-wearing material that provides waterproofing characteristics to a pitched roof, unlike other roof materials which absorb water. This means that slate is unaffected by frost, freezing & fire damage.
So you’ve come to the decision that slate is the optimum option for your roofing project, but how do you slate a roof? Here at Heritage Roofing Group we’ve created a summarised guide on how to slate a roof.
So here it is…

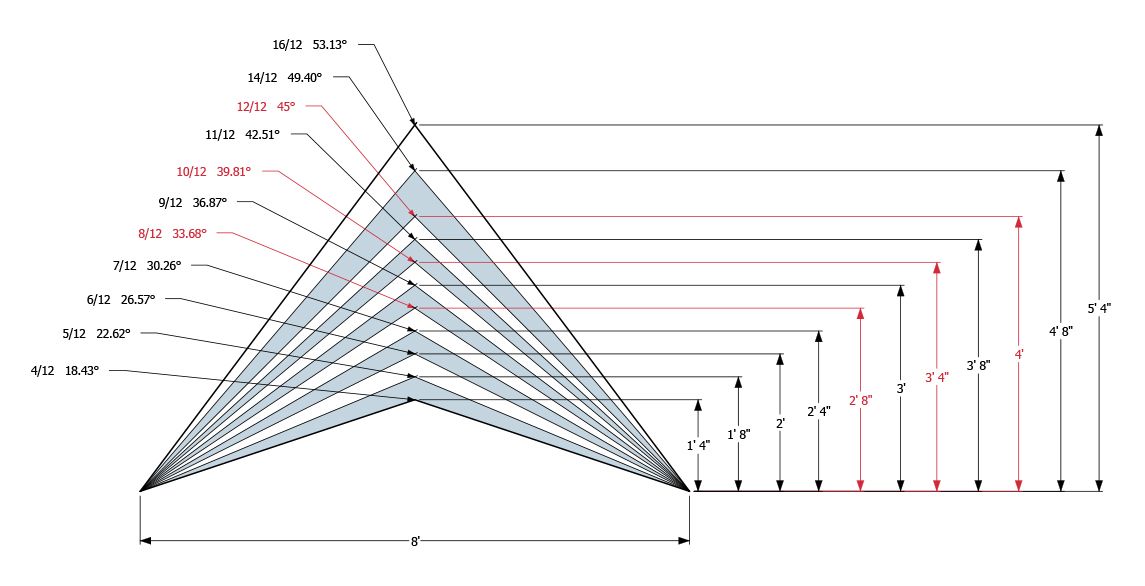
1. Find out the pitch of your roof
Before starting the installation process, you need to find out the pitch of your roof – the roof pitch dictates how much overlap is required with each slate. This has been made easier with the development of technology – most smartphones nowadays can access apps that have been designed specifically to find out the pitch or angle of your roof.
2. Find out the required overlap
Once you’ve found out the pitch of your roof, take a look at the slate manufacturer’s specification – each manufacturer will suggest the required overlap in order to form a stable and secure slate roof.
3. Roll out the roof sarking
Firstly, ensure your rafters or trusses are clean of any splinters or old nails that could damage the sarking. Then roll your chosen roofing sarking along the roof trusses – start from one bottom corner and rolling it along to the other corner.
Repeat this method and work upwards to the top of the roof. Make sure the roofing sarking hangs over the bottom of the roof and into the gutter to provide and encourage any water that gets past the slates to drain off into the gutter.
4. Secure the roof sarking
Once the sarking has been rolled out, use clout nails to secure one edge. Then pull the sarking taut at the other end, and fix into position, before adding a few more nails across the sarking where it meets the timber trusses for extra stability.

5. Batten placement
a) The next step is to work out the placement of the battens – to do this you’ll need two full sized slates and an under eaves slate. Place two battens onto the roof on top of the overlay – don’t fix them down so they can be moved around for adjustments easily.
b) Now place a full sized slate onto a batten, with an overhang into the gutter of around 50mm, and with the pre-drilled holes lined up with the centre of the batten – then put temporary fixings into the batten.

c) Next, put the second batten underneath the slate, and slide it upwards towards the first batten. Take the eaves slate and position it onto the second batten, ensuring it reaches the bottom of the roofline.
d) Secure both battens into the roof rafters using galvanised nails – ensure both battens are parallel by measuring from specific points along the roofline, checking that the difference in distance between them remains the same.
e) Add a third batten, sliding it from the top down wards to below the top of the slates. Make sure that the top of the full sized slate is sitting central to the batten.
f) Place a second full slate onto the third batten, ensuring the pre-drilled holes are lined up with the centre of the batten – double check the batten is parallel, then fix it into place.
6. Lay the roof slates
Now the roof has been set out correctly, with the battens at the right distance apart, its time to lay the slates. Start by laying the under eaves course, creating a staggered pattern for stability – a 5mm gap between each slate is required to allow for natural expansion.

So hopefully that simple guide gave you a good idea of how slate should be installed & if installed correctly by professional slaters your roof will last 100 yrs & beyond!

If you need any help or advice please don’t hesitate to give our team of experts a call on 0451 399 226 or email kyle@heritageslateroofing.com.au for a free roof quote.
Happy Reading,
The Heritage Team.
